Master Bedroom Makeover
- jaymie page
- Dec 28, 2022
- 6 min read
Updated: Jan 29, 2023

After my daughter was born and i was on maternity leave, I decided to get right to work on our bedroom. I may have been exhausted but after carrying a baby atound for 9 and a half months, your body feels amazing having it (almost) all to yourself again.
These are the listing pictures of our room when we bought our house. I never ended up taking many before pictures so these will just have to do.
I went to our local hardware store and picked out a paint. Im not about spending tons of money on paint. I know so many influencers out there will get you to go with behr or sherwin williams. Those paints are very nice and good quality but i don't necessarily need the best quality paint in my room.
The Easycare paint at the hardware store did just fine and it was about $10 cheaper per gallon. This was nice as i had an off white color going over grey so i needed two gallons for two coats. In hindsight, i really wished i would have just done the first coat in white kilz primer and then just done one coat of the paint. Primer is cheaper per gallon so I would have saved even more money. But you live and learn.
The color I chose is called "Full Moon" by Easycare and I picked a satin finish. If you have a lot of imperfections on your walls, i will suggest using a matte or eggshell finish because it hides those better. The more glossy/shiny your finish is, the more you will see imperfections on your walls.
I absolutely LOVE this color. Its like the color of painters canvas. And a perfect softness for a relaxing bedroom. Here are some real life messy before pictures of the painting process.
I did decide to paint the window trim as well. If our window sashes were the original wood and matched the trim, i would have left them alone. But to have white vinyl windows, then wood trim, then painted walls was just too many lines and unnecessary contrasts.
While painting, i decided i didn't want our bed on the wall it was on. Unfortunately, that was really the only open wall for the head of our bed that wasn't obstructing a window or blocking a heat vent. Then i brought up the crazy idea of putting our bed in our closet to my husband. Per usuall, he was all for it because he has seen how my ideas almost always turn out great...even if it gives him more work to do lol
With our bed in the closet, we freed up a lot of floor space making our room feel bigger. Plus we now have two more walls open when before, our bed was too close to them to utilize them for anything. Having maximized our space potential, we were able to make our room look less cluttered.
The time came for him to help me remove our closet shelves. Of course everything had to be removed from the closet first and naturally, all of it ended up on our bed for a day or so. It really isnt fun making over a whole room when you cant take out any if the furniture and you have to live and function around what youre doing. Television shows make it look so easy but it will always take days, even weeks longer. Dont let yourself be fooled by HGTV.
After the built in shelves were removed, my husband cut one in half long ways to make it skinnier and we placed it back into the closet for a cute aesthetic look, replacing the brackets with more ornate ones i got half off at hobby lobby.
The florescent light in the closet was replaced with this amazing Opalhouse brand chandelier I found brand new in box on the facebook marketplace! Only $60
You can get this cute star garland on amazon! I have both this one and the one with the moons too in another part of my house. You can get two strands of the stars and two strands of the moons all for just $12! I've used them in holiday decor and also in my kids Hogwarts themed rooms. Click here for a link to those!

After adding a chandelier into the closet nook, we really had no use for the ceiling light in the middle of the room so we capped it and covered the hole with this decorative ceiling medallion. I got this one off of amazon and i love it! Click here if you want to check out the listing.
It was by sheer luck that our bed fit in the closet opening without having to remove the trim. Our original bed frame was a hair too wide but we had two queen frames anyways so we switched to our slightly skinnier one. This one was better because there werent a plethora of leg braces below and we could actually store bins under our bed. That's also why I choose platform beds. They save you money because you don't have to purchase a box spring with your mattress. They also increase your possible storage space because the opening under your bed is about 14 inches off the floor. Easier for cleaning as well! You can get a platform bed like the one I have by clicking here.

Then came the predicament of where to put everything that was originally stored in the closet? By happenstance, I had bought myself a wardrobe from ikea when I lived at my parents and didn't have a closet. We brought that over from my parents house and then downsized our apparel to fit everything. It worked great and I was happy for the reason to get rid of things.
This entire wall has been thrifted aside from the French Quarter sign.
Fireplace mantle: Facebook marketplace $30. And what luck, the color was already almost identical to my wall color!
Large gold frame: facebook marketplace $40
Small gold frame: garage sale $3
Vase: thrifted gift from a friend
Hanging Clock: thrift shop $1
The two pictures are prints from our wedding in New Orleans, hence the French Quarter sign.
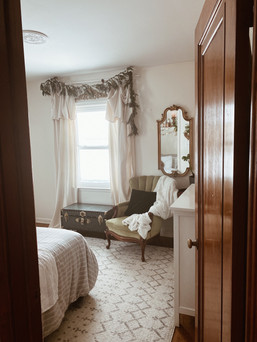
A couple more thrifted items! This green velvet chair came from marketplace, only $60. The woman I bought it from used it for photoshoots so it was in great condition! The mirror behind the chair is another marketplace find. $40!
The trunk was $25 at our local habitat for humanity. I fixed it up and painted my husbands initials on the side. It was part of the first birthday present I gave him after we met. Perfect for a Harry Potter fan! I even gave him ottoman legs in case he wanted to turn it into a coffee table or footrest which he did. It now holds our printer and other unsightly electronics.
Our dresser was broken and free on the side of the road. Its the red Ikea Hemnes 3-drawer chest, usually $200-$250 brand new. My husband fixed the broken bottom drawer and then we painted it white and bought new pulls for it. Total cost: $11. Real life problem; we really needed the dresser back in our room so it only has 1 coat of paint that you can kind of see through. It'll have to wait until spring for it's second coat, or at least til we get that weird heat wave on New Years lol.
The bookshelf I got a few years ago from Ikea. It was originally housing my apothecary but I now have a new cabinet for all of my herbs and things in the living room.
The round mirror was a hobby lobby clearance item for $25 and most other things on the dresser and bookshelf were thrift or garage sale finds. Some things were gifts. I always have about a thousand candles on hand, all from various places. I may have a candle problem but I have zero interest in going to candles anonymous or anything.

This may all sound expensive added up but most of these things were acquired over a year or two. This project wasn't something that I just did in a weekend. Like most real life home projects, there were setbacks and a couple months were we had to let some paychecks come in before getting around to the rest. We aren't poor by any means but we just like to live beneath our means. I will never influence or advocate for anyone to just blindly spend money they don't have to accomplish things. I will say though that having put a whole room together the way I want it and the way it functions best has given me a lot of peace of mind.
Winter Tip! Having extra warm bedding plus turning your heat down at night will save you money on heating.
Our bedding (for the winter, at the time of writing this) was all flannel sheets and duvets from Target a few years ago. After growing up in a drafty old farm house, I never NOT use flannels in the winter. They always have these at a pretty good price around the end of October or after Christmas.
Bedding Tip! Getting a comforter one size larger than your mattress size will cut down on the blanket fights between you and your partner, AND it will make your bed look 10x more luxurious!
I've always used a king sized comforter on our queen bed. We've always had enough blanket to share at night and haven't gotten cold. Now getting up and out of bed during those cold January mornings is a whole other fight lol!
And that's it on my bedroom makeover! Let me know what you think in the comments below or if you purchased any of the same things that I did. I would LOVE to see how you chose to use them!
Many blessings! - Jaymie


Comentários